| Software Music Machine Archive |
|
FruityLoops 101 - a tutorial for beginners
Submitted by hq_admin_smm on Fri, 05/12/2000 - 05:58.
Fruity Loops is an amazing program. I have never been a fan of Trackers (maybe I am just a little anti-DOS environment) which has always left me feeling like I was missing out on something.
Advertisement:
FruityLoops 101 - a tutorial for beginners
But alas! Now there is Fruity Loops and I don't care about trackers anymore. The program has been actually been around for a few years now, but it has really started taking off with its internal support for the TS404 and now, with version 2, support for real-time event recording. But we won't get too complicated with this introductory tutorial and we need to save something for the next installment. Right?
If this is your first time starting Fruity Loops you will need to configure your soundcard and MIDI in/outs. You can do this in the options menu under "WAVE Settings" and "MIDI Settings". Once that is in order, it is time to play.
Here is a Screen Shot:
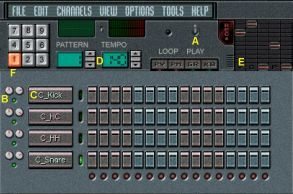
A.Play/Stop
B.Pan/Volume
C.Channel Settings
D.Tempo
E.Song Properties
F.Patterns 1-9
That should be pretty self explanatory. I will, however, explain C and F. Clicking on the Channel Settings buttong ('C') will bring up the screen I discuss below. The patterns bank ('F') can store up to 99 separate sequences, the 1-9 you see on the screen is a "quick-access" panel for the first nine. These patterns all have to use the same samples (ie. if you add a channel to one pattern, it will be present - albeit unused - in the others).
Here is the Channel Settings dialog:
A.Sample Chooser
B.Built-in FX
Clicking the Sample Chooser ('A') will allow you to select the wave file you wish to insert. Once you have done so, you can fiddle with the Built-in FX ('B') to make your samples sound cooler than you ever thought possible.
After selecting the samples you wish to play with, return to the main screen and start plotting your beats down by left-clicking the LED buttons that correspond to each sample. You can remove the beats by right-clicking them. Adding more channels would probably be a good idea too since for most projects, four just won't do. Go to the 'Channels' menu and click "Add One/Drum" to insert a drum channel.
This will get you through the most basic Fruity Loops features. I will discuss some more advanced features such as the TS404 synth as well as the VST plugins in a future article. GO MAKE SOME ROCK AND ROLL (or anything else that tickles your fancy).
Here is a small list of Fruity Loops tips:
- Use the Ctrl button to fine-tune your knob adjustments
- If you think you messed an adjustment up, hold down the Alt key and click the knob to set it back to its default postion.
- Backup your *.flp files often. This should really hold true for any program.
- When you have completed a song, use the Collect Samples feature (found in the 'File' menu) to copy all of the associated samples into one directory and save a copy of the *.flp file as well. That way you will be able to work on the song days, weeks, or months later without having to relocate all of your samples.
- Enter useful information about the song (ideas for changes, etc...) into the Song
- Info dialog (found in the 'Options' menu).
By Cilanntrus
ZeroWorks.Org is is an independant force that moves to the sound of a million different rhythms and harmonies. To every ZeroWorks.org visitor we offer tutorials, samples, reference material, reviews and interviews all designed to give you, the surfer, the inside track on the audio world. We offer entertainment in the form of our E-zine Bands section and hands on communication with our message board areas. And, of course, it is all free.
Share This Article |